Fix Audiodg.exe High CPU usage in Windows 10
Fix Audiodg.exe High CPU usage in Windows 10
Share onIf you are facing Windows Audio Device Graph Isolation or Audiodg.exe high CPU usage or memory leak issues on your Windows 10/8/7 computer, then this post suggests some ways you could try to troubleshoot the issue. Sometimes a simple computer restart can solve the issue, but if it does not help, you may need to troubleshoot.
If you are facing Windows Audio Device Graph Isolation or Audiodg.exe high CPU usage or memory leak issues on your Windows 10/8/7 computer, then this post suggests some ways you could try to troubleshoot the issue. Sometimes a simple computer restart can solve the issue, but if it does not help, you may need to troubleshoot.
Windows Audio Device Graph Isolation is the executable that helps you get a better sound quality. Apart from sound enhancement, you get different audio effects because of this executable file. By default, Windows Vista and all the later version of Windows have this audio engine file, located in the C:\Windows\System32 folder.
Audiodg.exe High CPU usage
Audiodg.exe file may start using high CPU or memory if your system is infected with malware or if the concerned audio driver has become corrupted or got damaged. Here are some things you could try.
1] Uninstall and reinstall Skype
Completely uninstall the Skype app or the desktop software, restart the computer and then install it afresh and see if it helps.
2] Update the Audio driver
If you have recently installed a new sound device and started getting this high CPU usage problem, maybe you need to install the proper audio driver – or update your existing driver to its latest version. Identify your audio device, go to the manufacturer’s site and download the applicable device driver for your computer system.
3] Disable all Sound effects
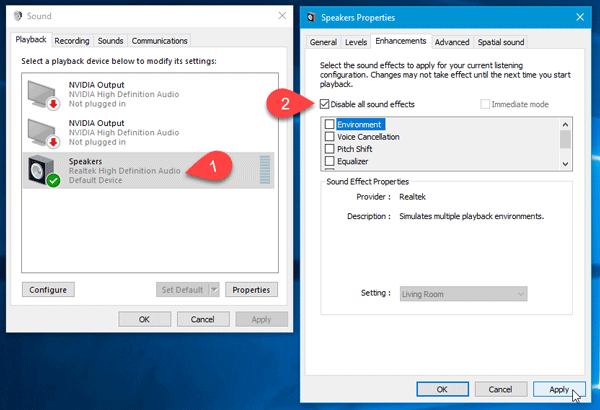
If you are currently using any sound effects (system-wide), you should try disabling that and check whether the problem is resolved or not. To disable Audio enhancements, right-click on the Audio icon in the system tray and select Playback devices. Sound Properties box will open. Your speakers will have a green check-mark. Select it and click on Properties button. After opening Speaker Properties window, switch to Enhancements tab. Now, make a tick in the Disable all sound effects checkbox and save your change.
4] Run Audio Troubleshooter
Run the built-in Audio Troubleshooter and see if it helps, You will be able to access it via the Settings Troubleshooters page. If you need more ideas, this post shows how to troubleshoot Windows 10 Sound and Audio problems.
5] Scan PC with antivirus
If the audiodg.exe file is located in C:\Windows\System32 folder it is the legit Microsoft file; else it could be malware. So scan your PC with a good antivirus software to be sure.
Hope our suggestions help you fix the issue.